Introduction
Recently we converted a SAP BW 7.5 (SP 16) on HANA system to a BW/4HANA 2.0 (SP 05). SAP provides you with three conversion paths, the so-called “In-place Conversion”, “Remote Conversion”, and “Shell Conversion”. Here we followed the “In-place Conversion” path as the system was already almost BW/4 ready. This document provides a rough idea how the different steps look like. This was a demo system of ZPARTNER, doing the same for a productive system could be slightly more challenging the steps will be the same.
To perform the Conversion, SAP is providing the Conversion Guide. We followed the steps described in the Conversion for the “In-place Conversion”. Overall, we would recommend to get familiar with the Conversion Guide (https://help.sap.com/doc/c3f4454877614bc7b9e85ae1f9d1d2c7/1.0/en-US/SAP_BW4HANA_10_Conversion_Guide.pdf) for a better understanding of the process.
Preparation
Installing SAP BW/4HANA Starter Add-on
The Starter Add-on supports you during the conversion. How to install the Starter Add-on is described in the conversion guide.
SAP Note Analyzer
After the Starter Add-on is installed you need to update the SAP BW/4HANA Transfer Cockpit with the SAP BW Note Analyzer. The SAP BW Note Analyzer is executed by running the report Z_SAP_BW_NOTE_ANALYZER. The latest XML file for the system conversion is continuously updated in SAP NOTE 2383530 (https://launchpad.support.sap.com/#/notes/2383530). To run the SAP BW Note Analyzer with the latest XML file Select the “Load XML file” Button (Figure 1).
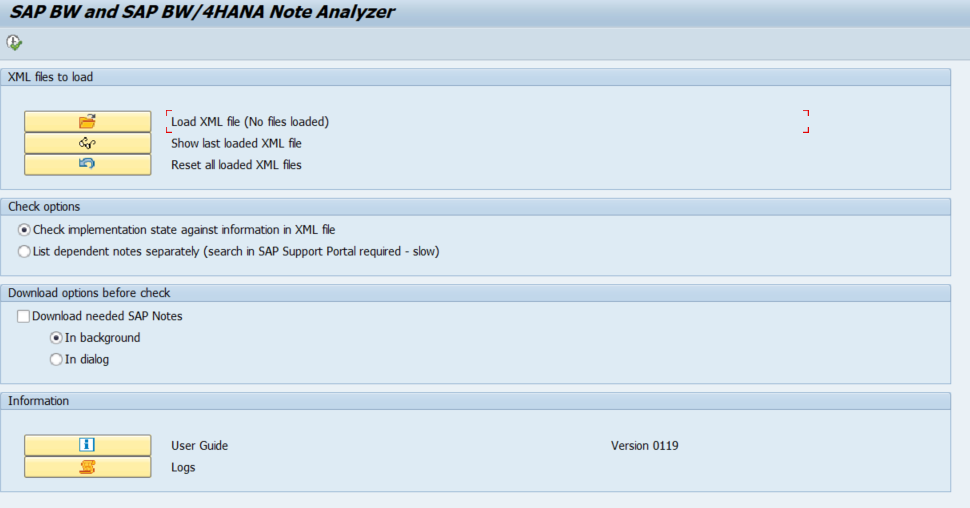
Figure 1: SAP BW Note Analyzer
Then you select the File for the In-place Conversion (Figure 2).
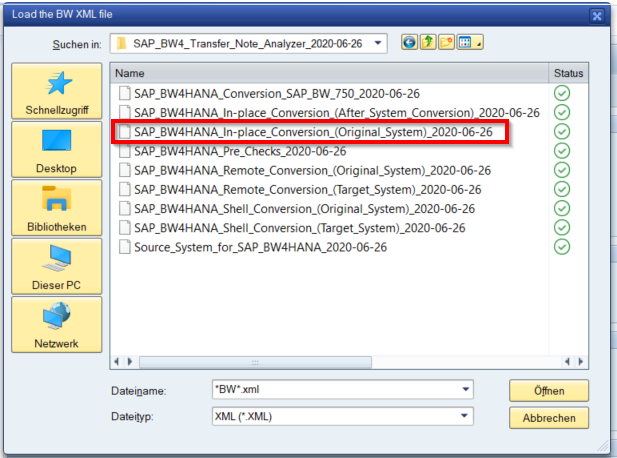
Figure 2: Select XML file for SAP BW Note Analyzer
After selecting the XML file, it is possible to run the Note Analyzer. Before running the program, you can select if missing Notes should be downloaded already. The result will show a list with missing Notes to be installed. The missing Notes need to be implemented and then the overall status should be green or yellow like in Figure 3.
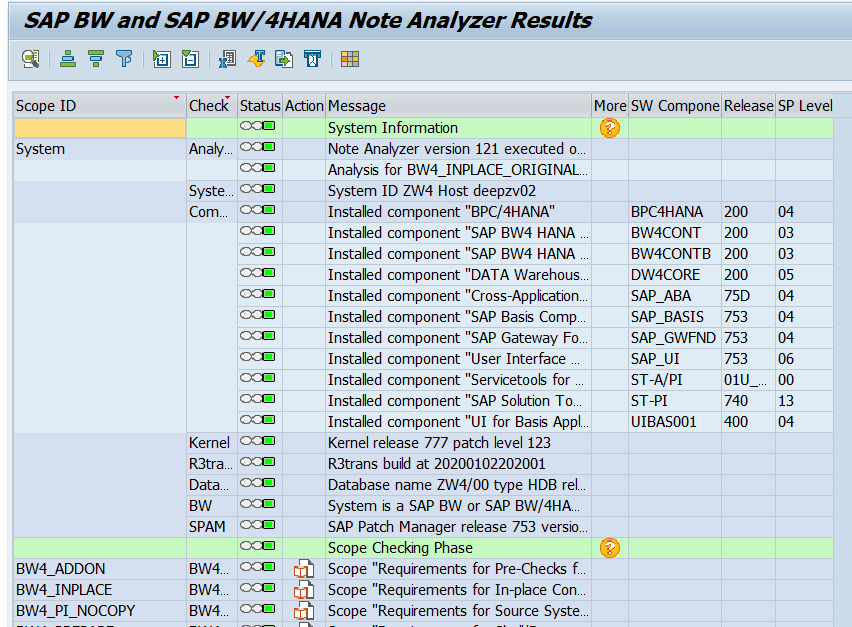
Figure 3: Result SAP BW Note Analyzer
Realizing the Conversion
BW/4HANA Transfer Cockpit
The SAP BW/4HANA Transfer Cockpit is the main interface to perform the most tasks which need to be executed during or before the conversion. It can be accessed with the transaction RSB4HCONV.
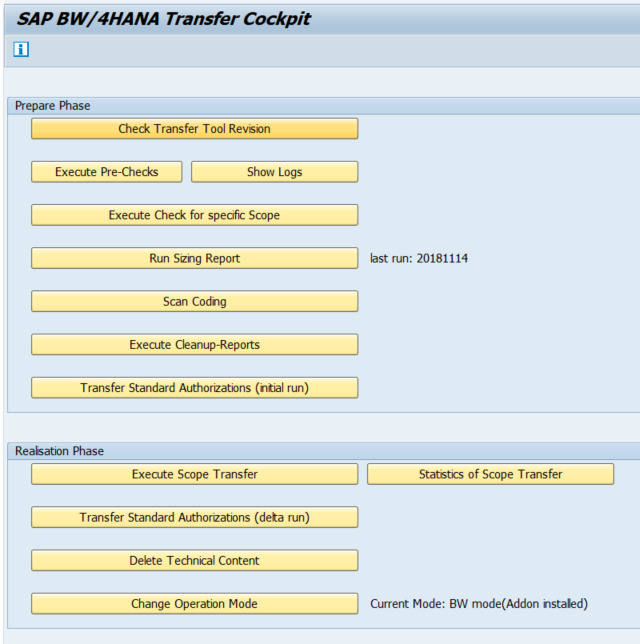
Figure 4: SAP BW/4HANA Transfer Cockpit
Pre-Check Report
The first step during our conversion was to execute the Pre-Checks which can be done from the SAP BW4/HANA Transfer Cockpit. It is possible to execute this step either Online or in Batch.
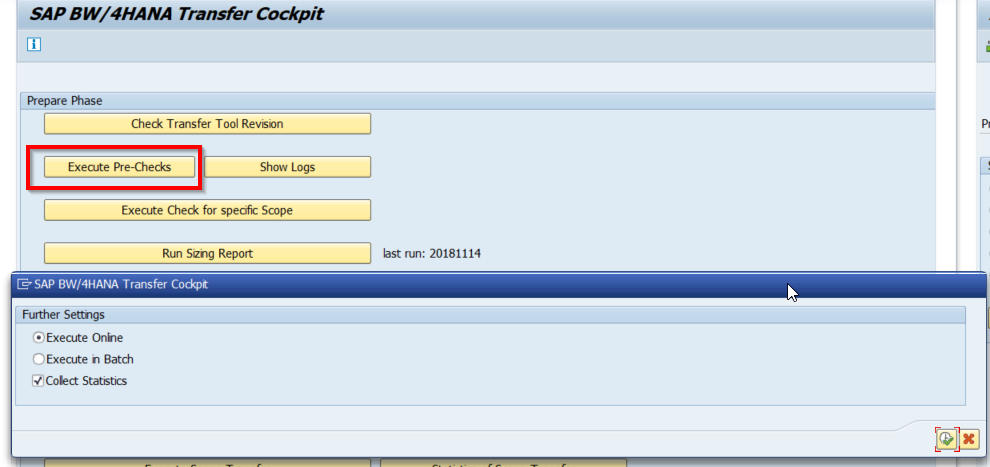
Figure 5: Execute Pre-Checks
After the successful execution, a report is created which tells you which objects need to be taken care of. For most objects there is also a Note shown how to handle them. Additionally, you get the information during which Operating Mode the objects will be checked. This lets you know before changing an Operating Mode that these objects might cause an error and need to be taken care of beforehand.
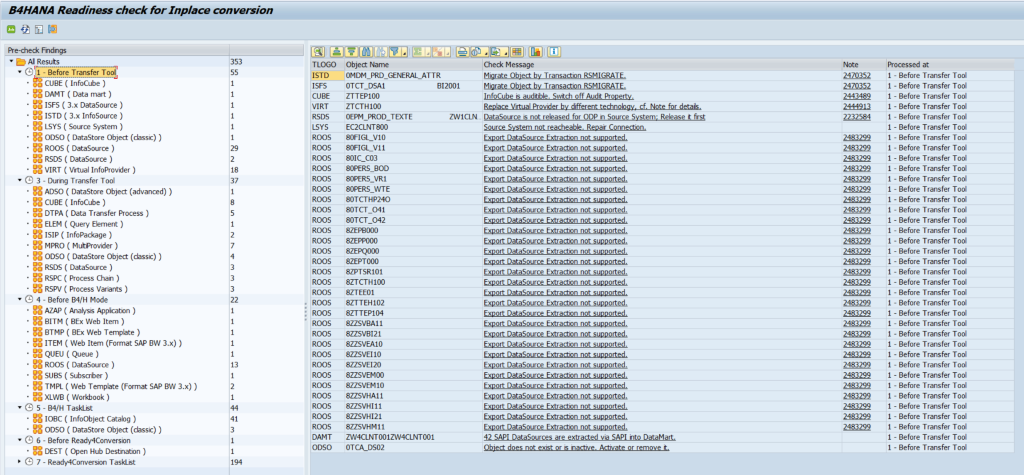
Figure 6: Readiness check for Inplace conversion
You have the following options:
- Conversion where possible
- Remodeling with “new” objects
- Deletion.
Deletion of Objects
As we deleted many obsolete and not used objects, there is the possibility to manually delete them but there are also other options.
Delete Objects with RS_DELETE_TLOGO
For mass deletion of objects, the program RS_DELETE_TLOGO can speed up things a bit. ATTENTION: The usage of this reports needs to be handled with care. Used wrongly you can destroy your BW system!!!
ROOS DataSources
The Readiness check showed us DataSources with TLOGO ROOS (Export DataSources). It is not possible to delete them with the program RS_DELETE_TLOGO, but there exists the program RS_B4HANA_ROOSGEN_CLEANUP.
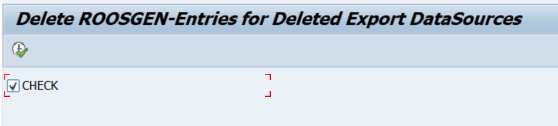
Figure 7: Program RS_DELETE_TLOGO
In some cases we had to delete them manually from the table ROOSGEN:
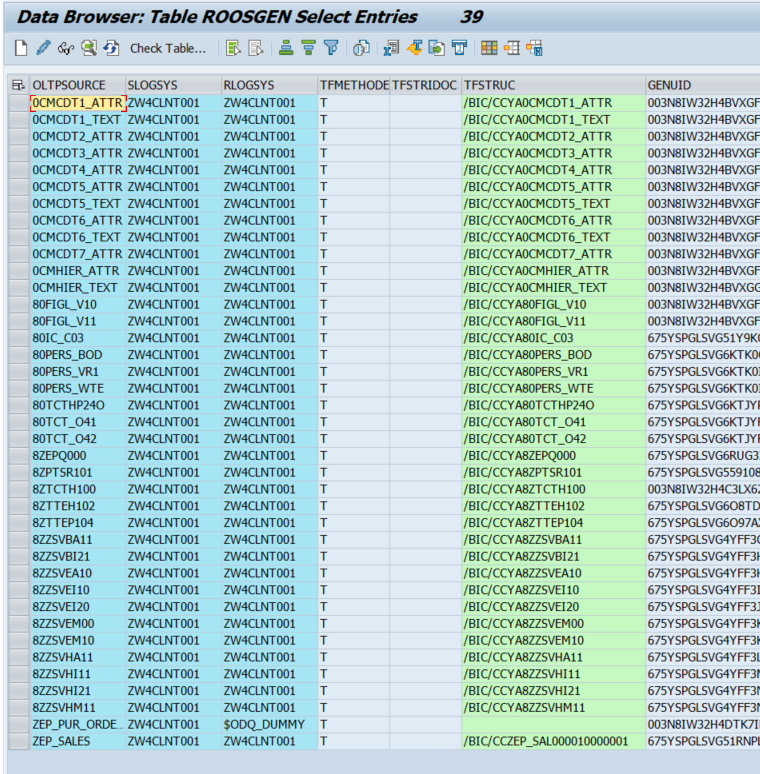
Figure 8: ROOSGEN table
Deinstall Components
In the system an AddOn (DSIM) was installed previously which was at the time not BW/4 ready. Before performing the conversion, it was necessary to uninstall previously installed components, because they will block the conversion. The components can be uninstalled and upgraded via the transaction SAINT.
To uninstall the components, we had to upgrade(!) the AddOn Demand Signal Management (DSIM) before. As you can see in Figure 9 not all components were available for uninstallation before.
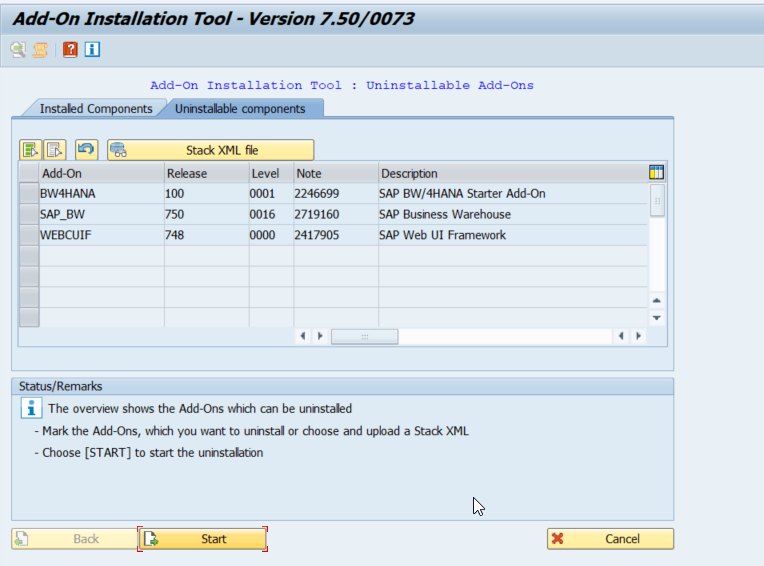
Figure 9: Before DSIM Update
After the update, the components are available for uninstallation (Figure 10).
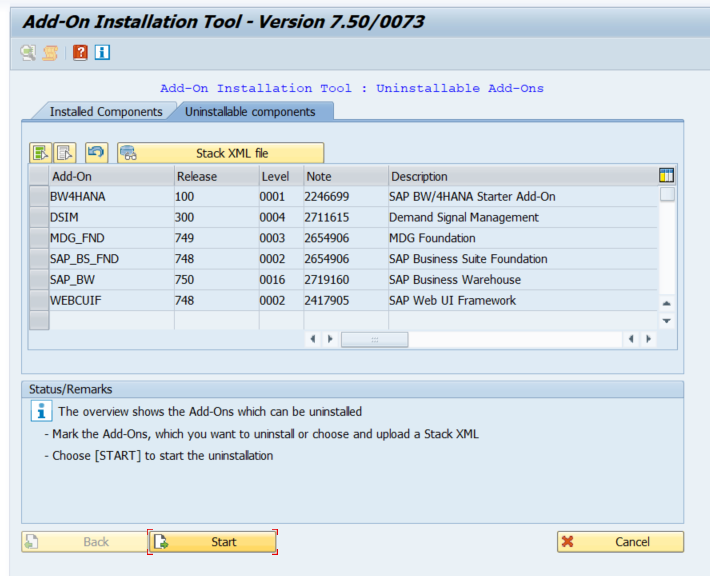
Figure 10: After DSIM Update
For the uninstallation of MDG Foundation (MDG_FND) and SAP Business Suite Foundation (SAP_BS_FND) SAP NOTE 2654906 needs to be considered (https://launchpad.support.sap.com/#/notes/2654906). We would recommend uninstalling the components in the background.
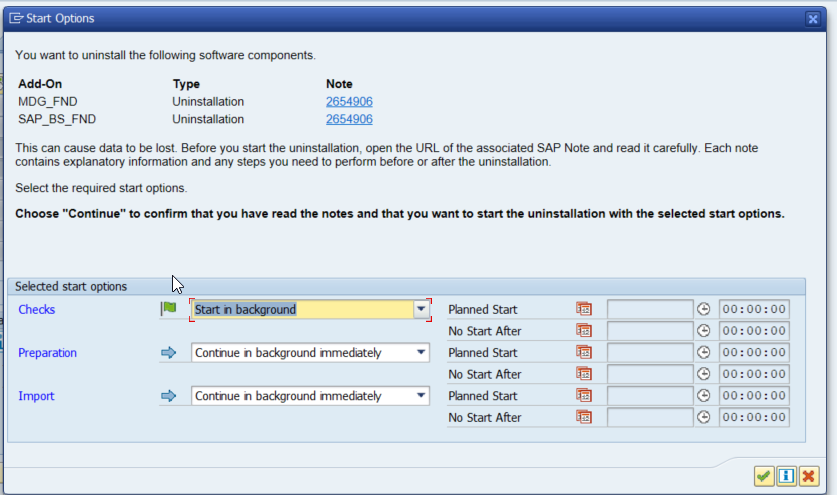
Figure 11: Start Uninstallation in background.
For the uninstallation of the SAP Web UI Framework (WEBCUIF) respect SAP NOTE 2417905 (https://launchpad.support.sap.com/#/notes/2417905). If you have not implemented, it before you will get a warning to do so (Figure 12).
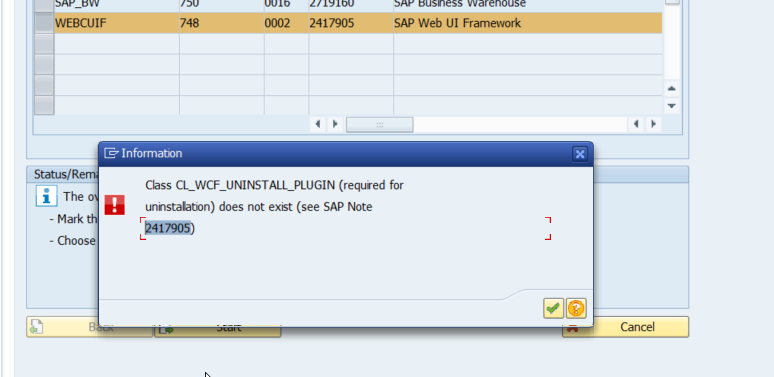
Figure 12: Uninstallation of WEBCUIF
The uninstallation of the components will stop at certain points. Then it is recommended to repeat the task in dialog because the system will ask to confirm or execute certain tasks. (Figure 13 & Figure 14)
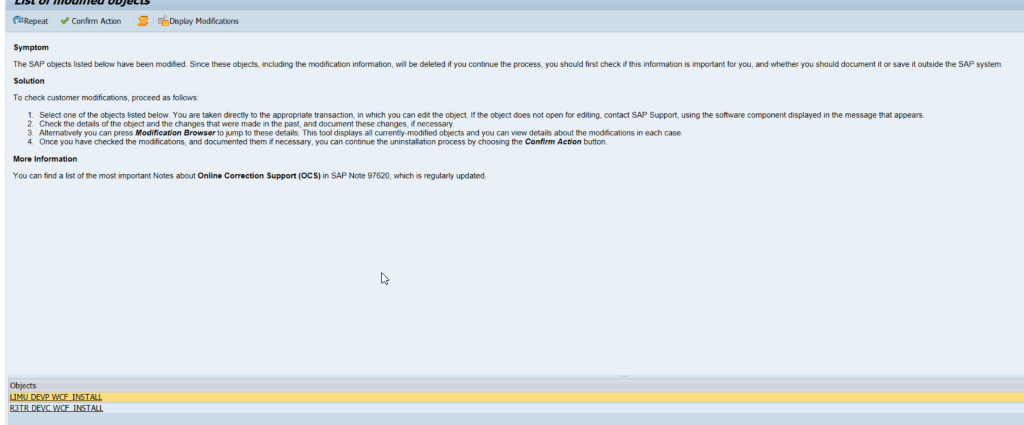
Figure 13: Confirm Action during Uninstallation
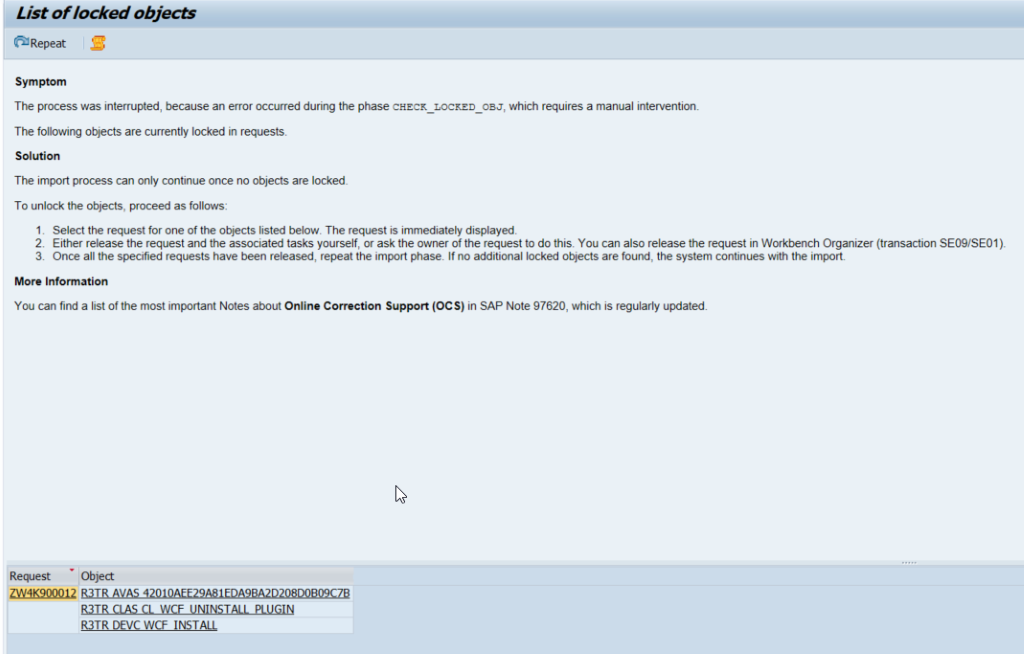
Figure 14: Release Request during Uninstallation
Deletion of Technical Content
Before changing the Operating Mode from Compatibility Mode to the B4H Mode the technical content will be checked. There is a separate Button in the BW/4HANA Transfer Cockpit to do so.
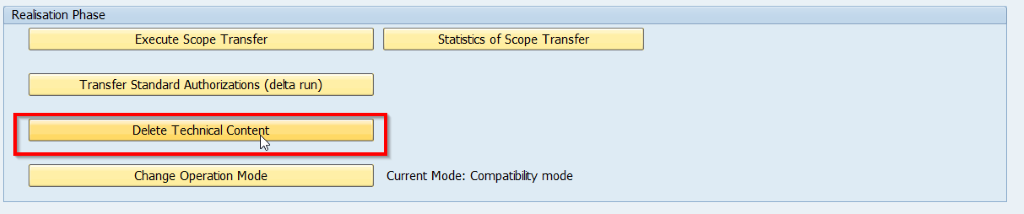
Figure 15: BW/4HANA Cockpit Deletion Technical Content
Execute the Deletion (Figure 16)
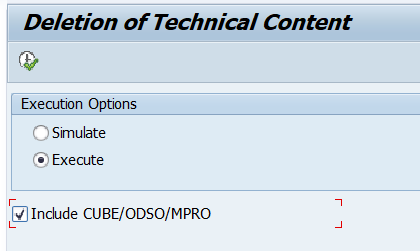
Figure 16: Deletion of Technical Content
Changing Operating Modes
During the realization of the conversion it is required to change the Operating Modes in SAP BW/4HANA Transfer Cockpit. The different modes request different actions to be beforehand (like deleting or transferring “old” objects to “new” objects). Please refer to the Pre-Check Report which objects need to be handled before each Operating Mode can be set. The Conversion Guide will give you more insights on the different Operation Modes.
To Compatibility Mode
The Operation Mode can be changed in the SAP BW/4HANA Transfer cockpit.
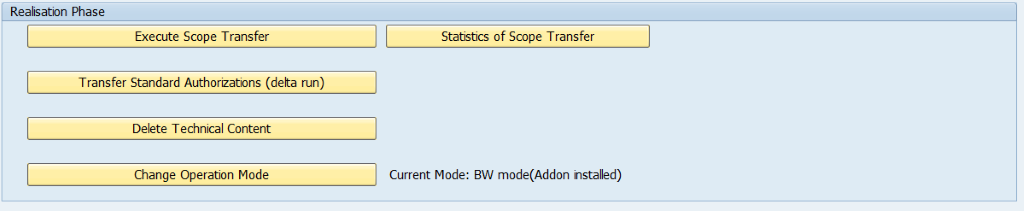
Figure 17: Change Operation Mode
The new mode can be selected and executed (Figure 18).
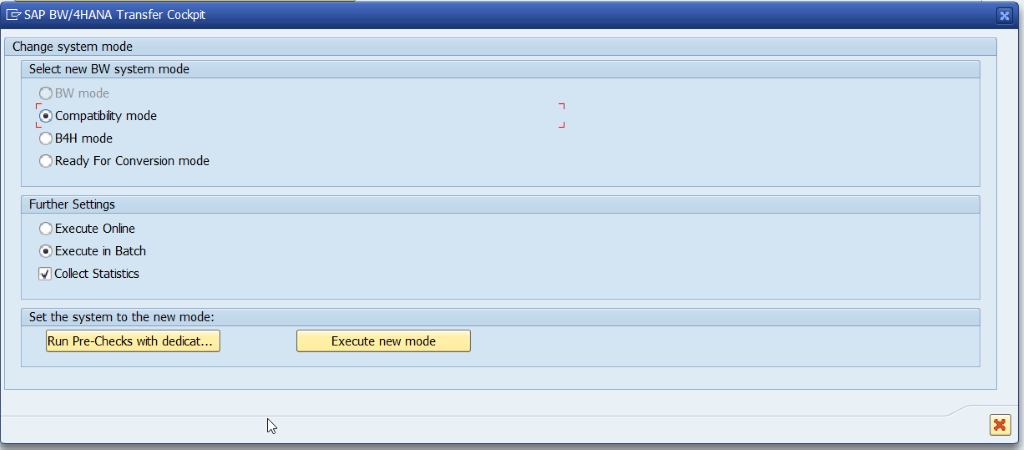
Figure 18. Execute Compatibility Mode
After the Execution, the Compatibility mode is set.
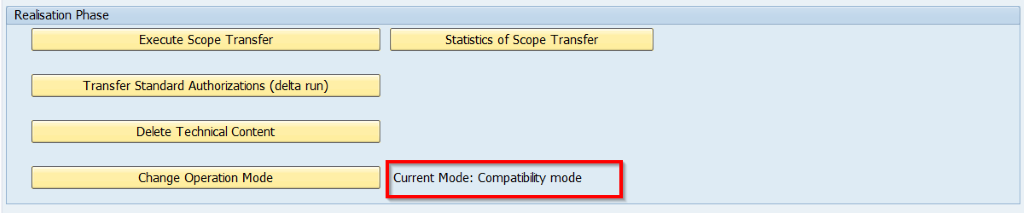
Figure 19: Compatibility Mode set
To B4H Mode
When executing the B4H mode a Task List Run will be created and needs to be processed (Figure 20).
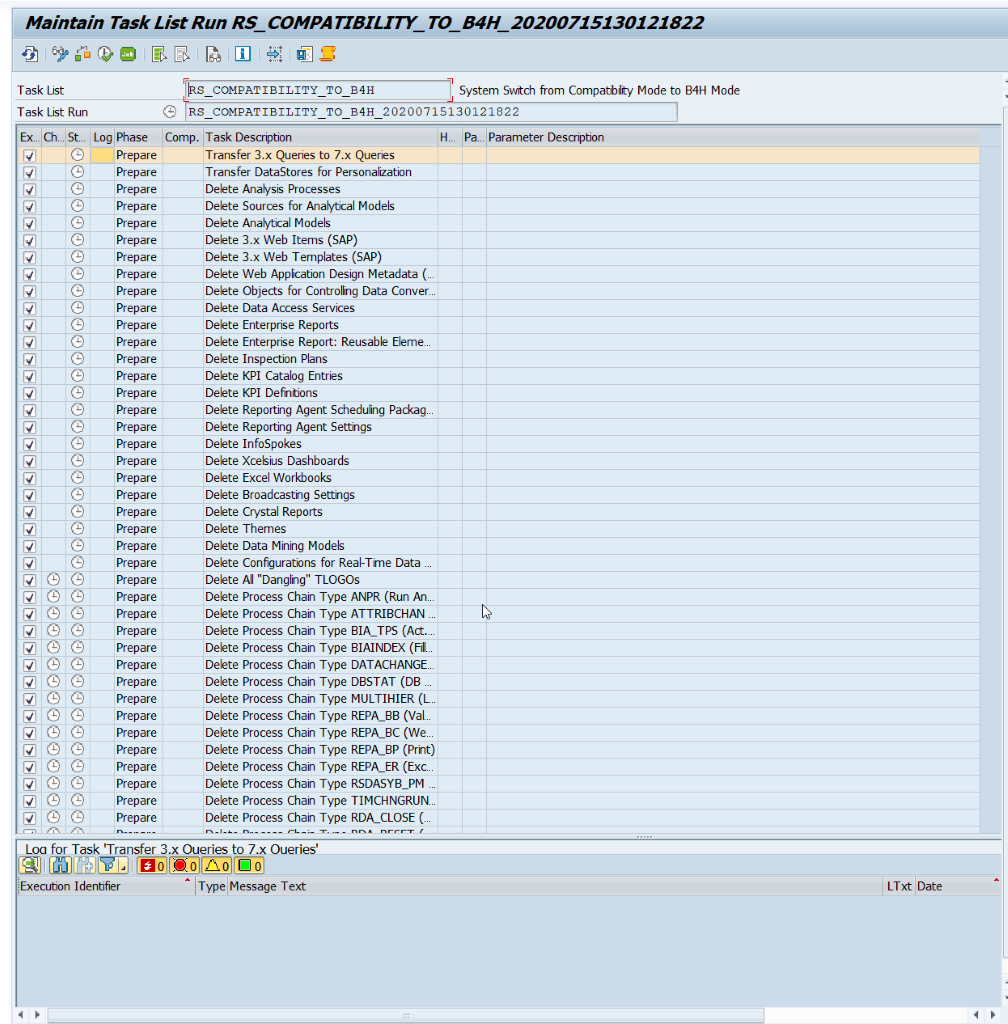
Figure 20: B4H Mode Task List Run
We started the Task List Run and at a certain point it stopped due to an Error (Figure 21).
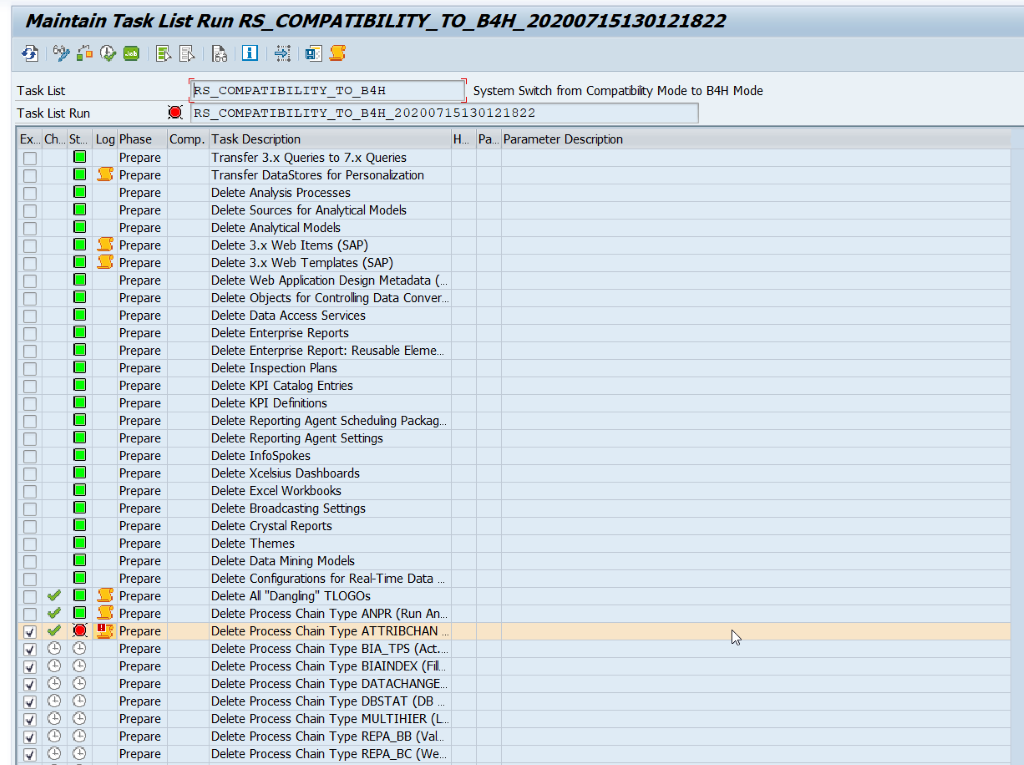
Figure 21: Task List Run is stopped
By continuing in dialog, we were asked for a Transport Request and could continue with the Task List Run (Figure 22).
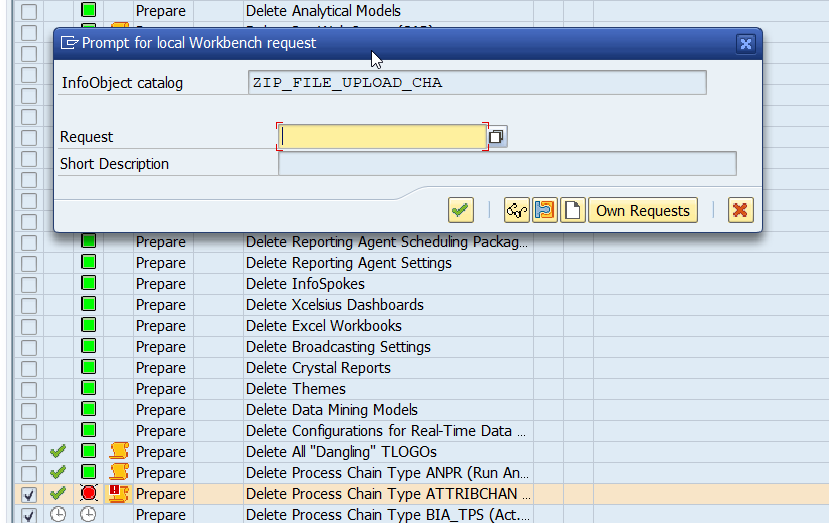
Figure 22: Creating Transport Request and continue with the Task Lis Run
At another point the Task List run was stopped to confirm the deletion of not supported source systems (Figure 23).
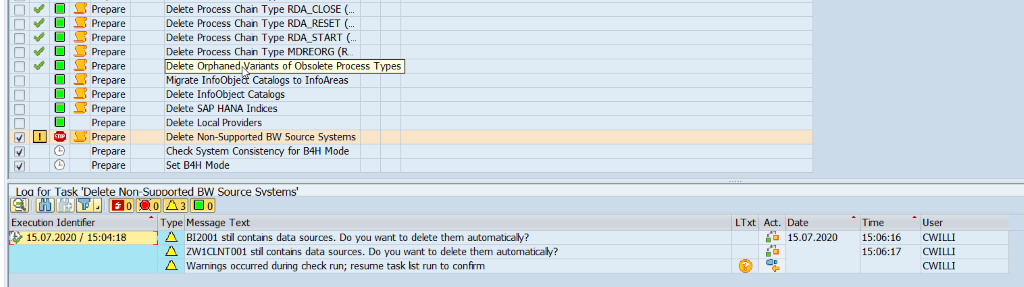
Figure 23: Deletion of not supported source systems.
And finally, the switch to the new mode needed to be confirmed.
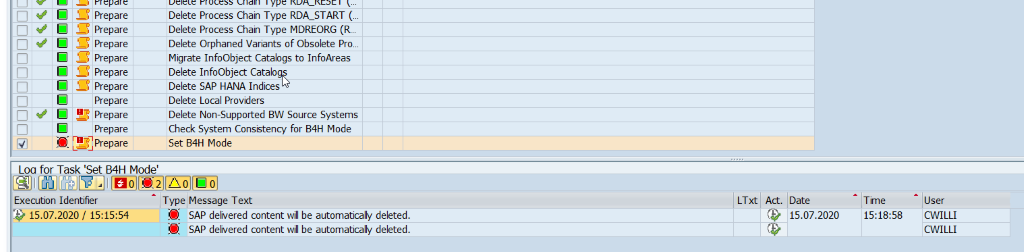
Figure 24: Confirm Switch to B4H Mode
Hint: If there occurs an error at the end debug the class to check which objects still block the finalization of the new mode. Therefore, go to the log (Figure 25) to identify the class (Figure 26) which is used in this step.

Figure 25: Task List Run Log

Figure 26: Class for certain Task List Run Step
In this example there was an error shown at the final step and by debugging the class we could identify the objects which were still blocking the new mode setting.
To Ready for Conversion Mode
The final Operating Mode is the Ready for Conversion Mode. For the Ready for Conversion Mode also a separate Task List will be performed. In the first step set the parameters and start the Task List Run.
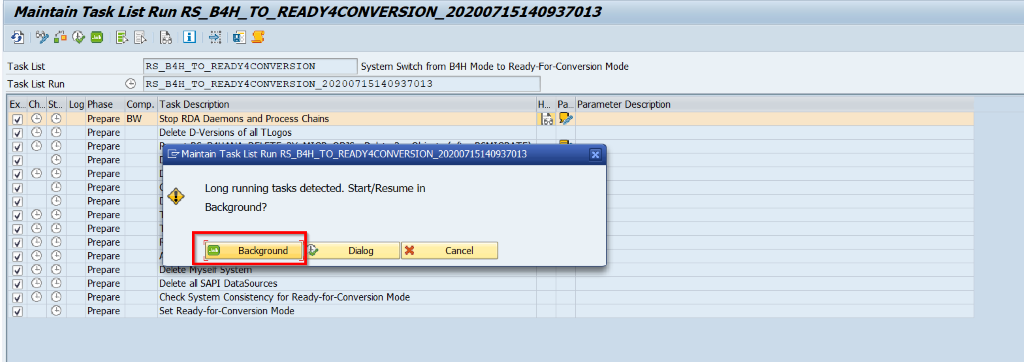
Figure 27: Task List Run Ready for Conversion Mode
The Task List Run stopped at the phase “Transfer from InfoObjects and Open Hub Destination”.

Figure 28: Phase Transfer from InfoObjects and Open Hub Destination
A separate Task List Run for the Transfer from InfoObjects and Open Hub Destinations will be started.
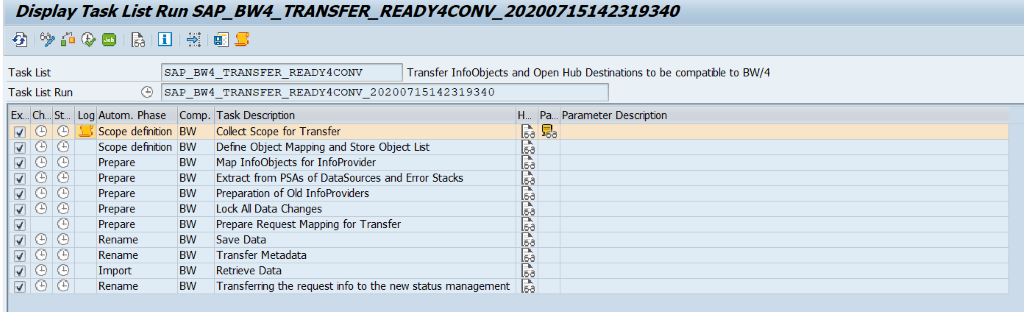
Figure 29: Task Lis Run Transfer from InfoObjects and Open Hub Destination
We got an error to handle several objects because they were inactive and Transfer rules needed to be deleted.
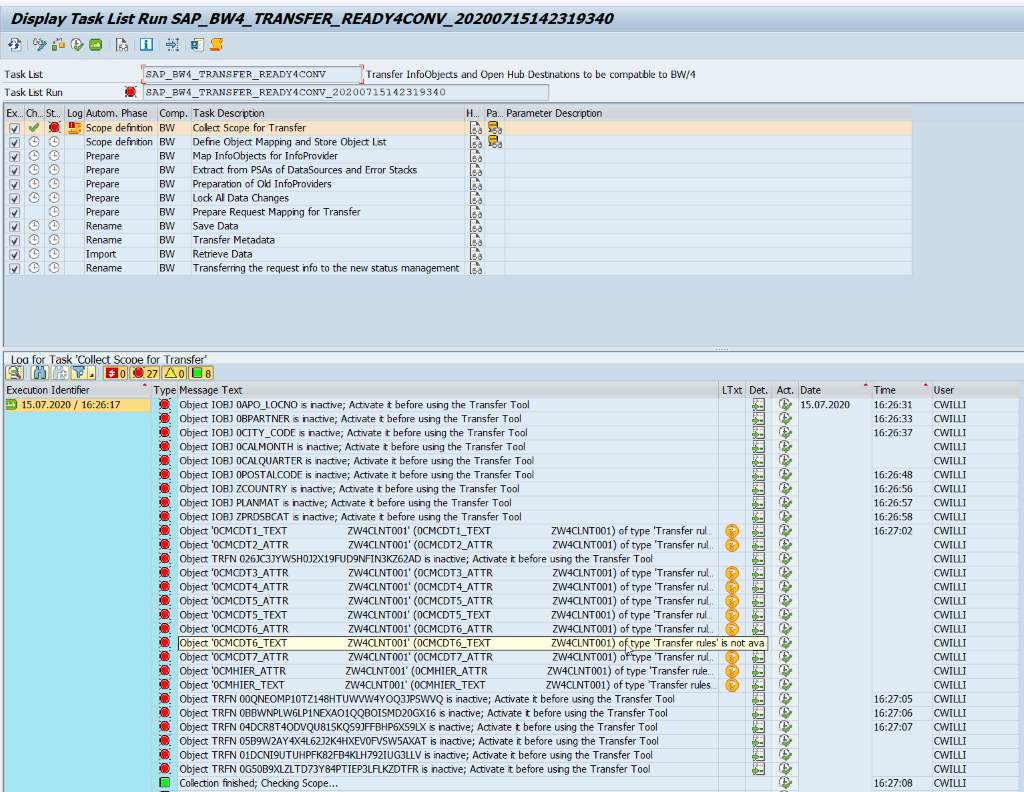
Figure 30: Error to handle certain objects
We activated the inactive objects and deleted the Transfer rules. The transfer rules could be deleted in the table RSISOSMAP.
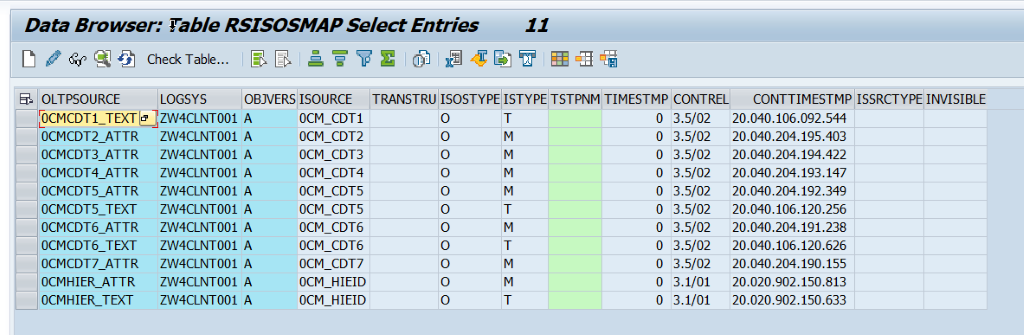
Figure 31: Table RSISOSMAP for Transfer Rules
Then we could continue the run. At the second phase the Task List Run stopped again and asked us to update the Transfer Tool. The Transfer Tool can be updated in the BW/4HANA Transfer Cockpit.
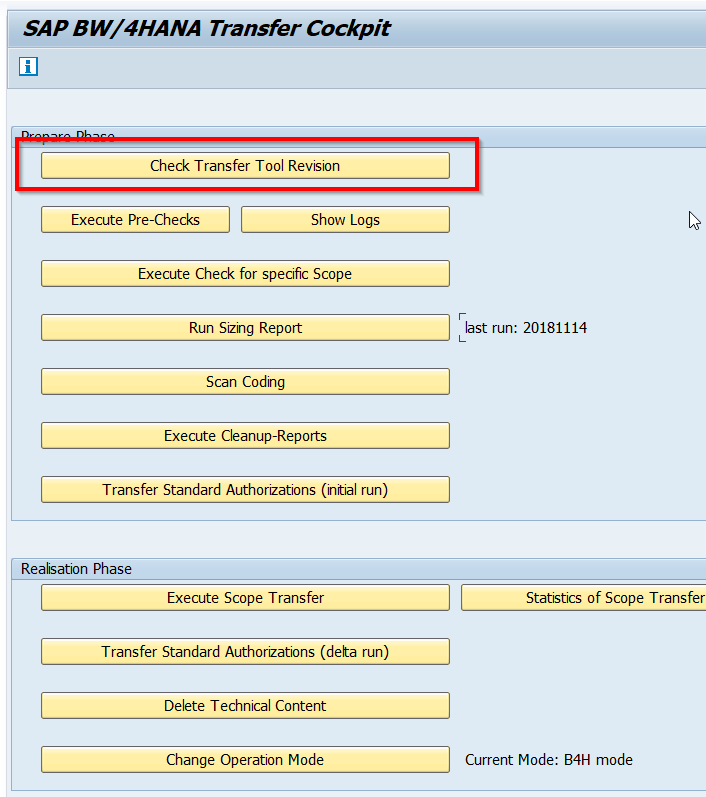
Figure 32: Update Transfer Tool
At a later point the Task Lis Run stopped again, asking us for releasing a request. After releasing the request, we could continue.
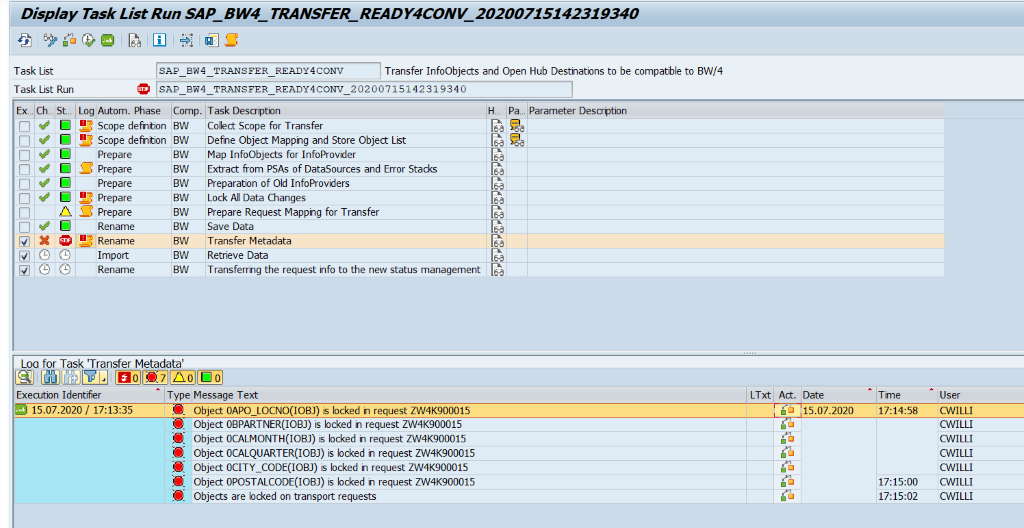
Figure 33: Release Transport Request
Hint: The final phase of this Task List Run is to transfer the requests into the new status management. If there is a request which is not transferred into the new status management, it is possible to debug it with the program ODQ_TQ_DEBUG_TASK.
The TASKID and the EXTERNALID can be found in the table ODQTASKQUEUE.
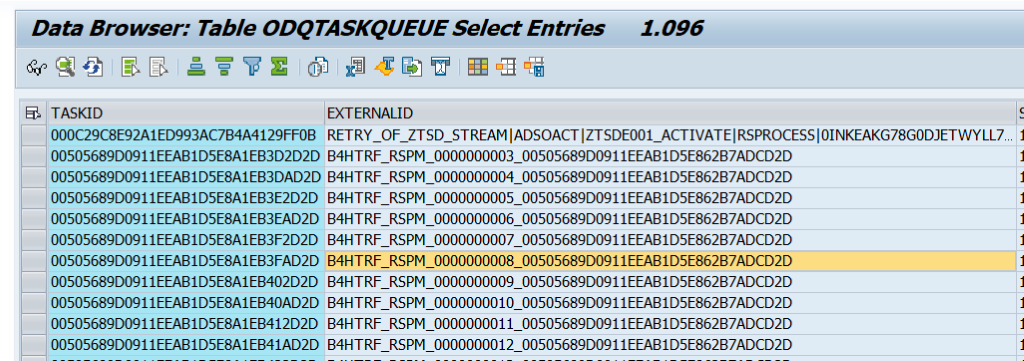
Figure 34: Table ODQTASKQUEUE
After this Task List Run was finished we could continue with the Task List run Ready for Conversion Mode.
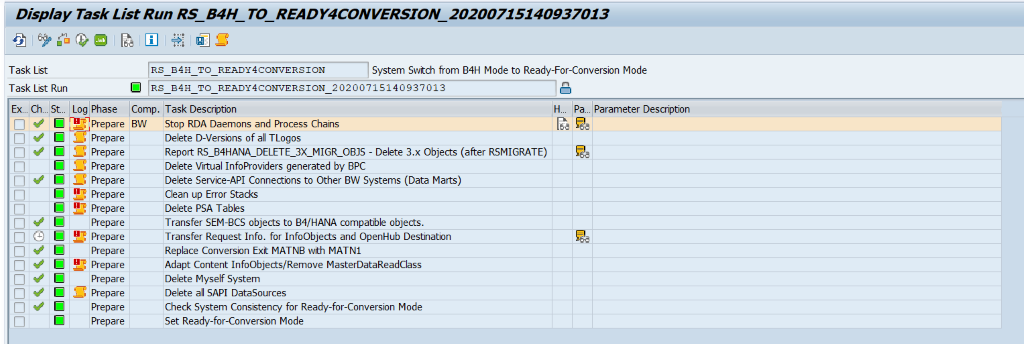
Figure 35: Finished Task List Run Ready for Conversion
And finally, our system was Ready for the Conversion!
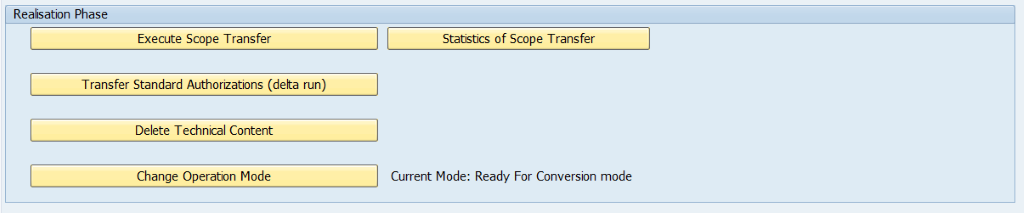
Figure 36: Ready for Conversion mode
Technical System Conversion
In the Conversion Guide the Technical System Conversion is performed with the transaction SAINT. We tried to perform the conversion as describe, but where not possible to start the conversion with the transaction SAINT. Due to that reason we performed the conversion with the Software Update Manager (SUM).
Maintenance Planer
The first step is to download the requested software packages in the Maintenance Planner. At first define the change in the Maintenance Planer (Figure 37).
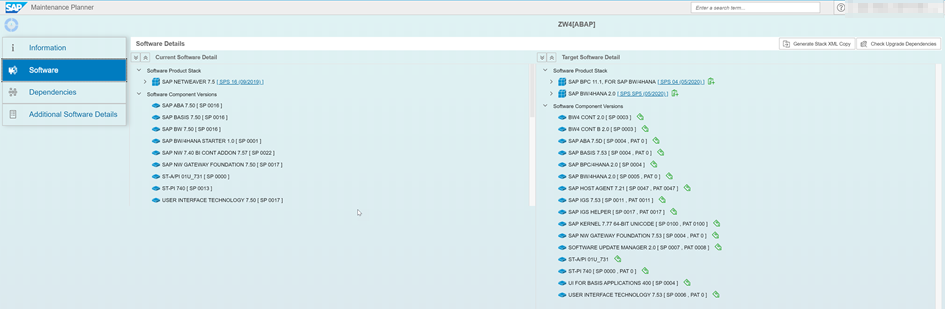
Figure 37: Define the change in the Maintenance Planer
Download the Stack XML file and push the required downloads to the download baskets.
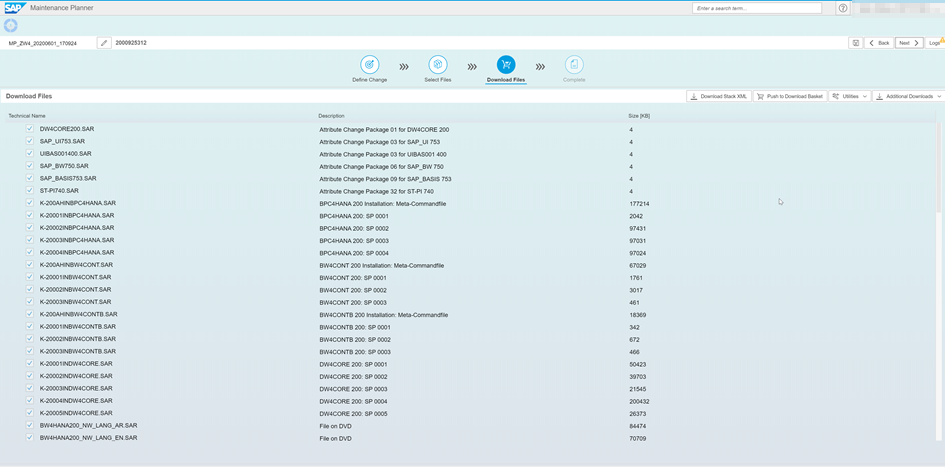
Figure 38: Download the Stack XML file
Software Upgrade Manger
For the SUM process we performed the following steps:
- Download the software
- Extract SUM
- Start SUM (only BW4 relevant screen shots are taken)
At first, we selected the Stack XML File
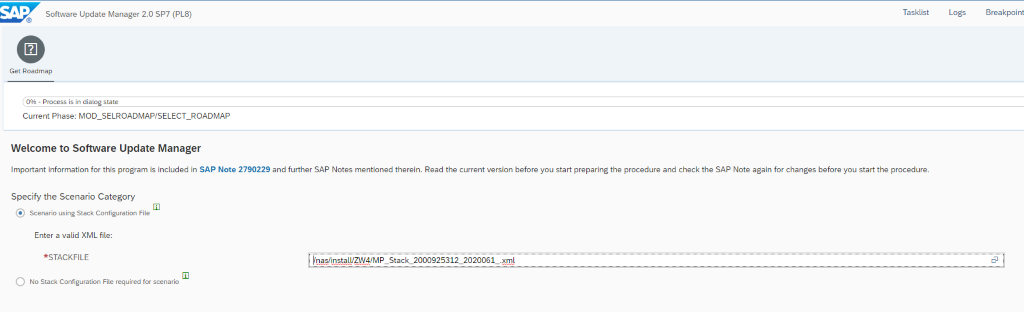
Figure 39: Select Stack XML File
Then the uninstallation of SAP BW had to be confirmed.
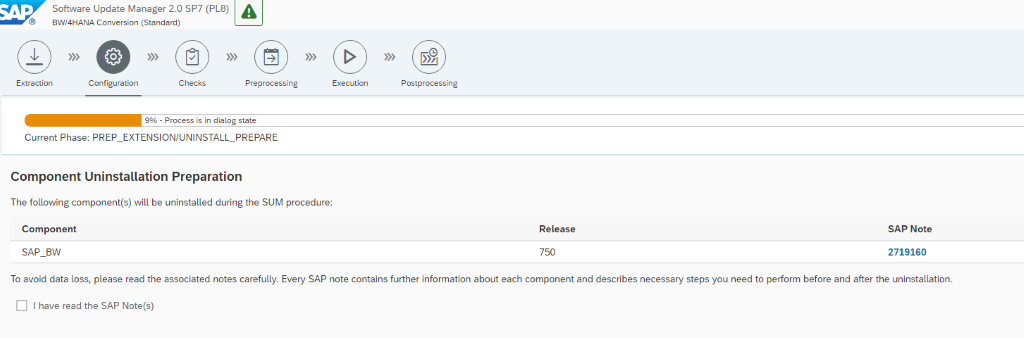
Figure 40: Uninstall SAP BW
Then we define the Target Support Package.
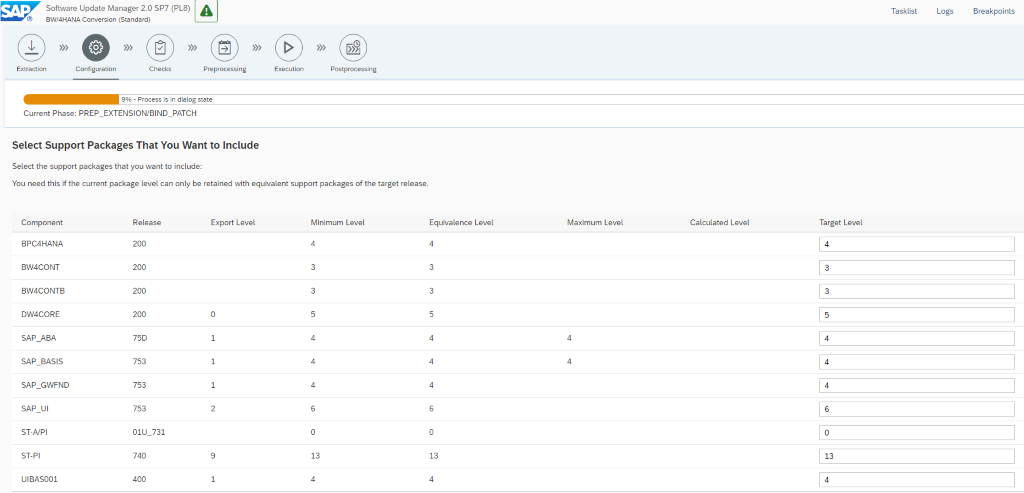
Figure 41: Target Support Package
Then we were ready to start the conversion.
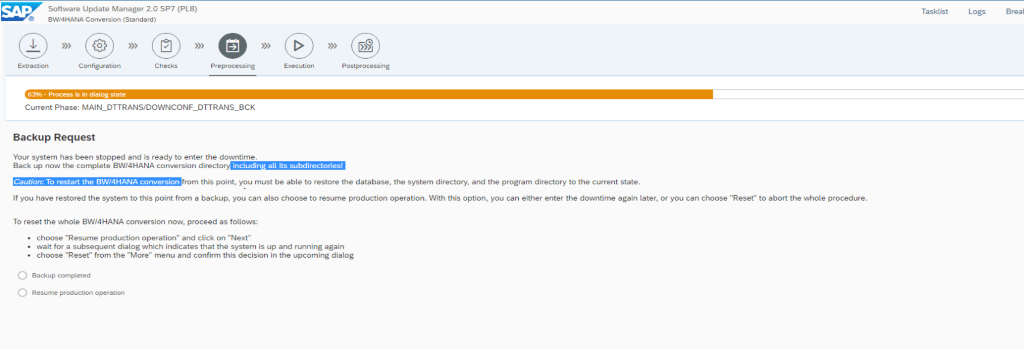
Figure 42: Start Conversion
A little bit later the Post-Processing steps need to be performed in the converted system.

Figure 43: Post Processing
The system is up and running.
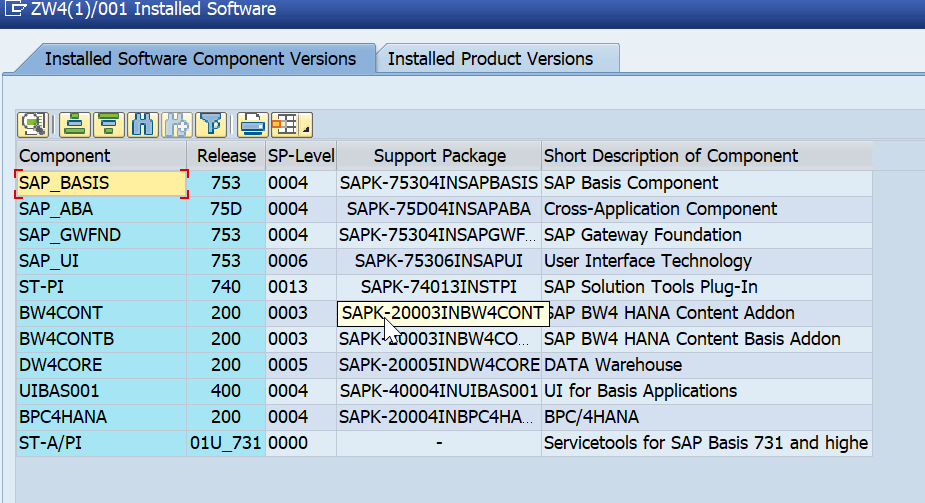
Figure 44: System Components BW/4HANA
The first step in the Post-Conversion is to start the SAP Note Analyzer and select the XML File “After_System_Conversion”.
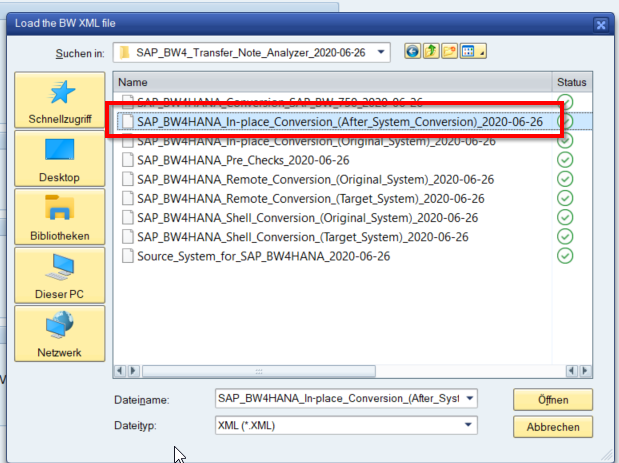
Figure 45: Select Post-Conversion XML File
In the Note Analyzer Result a few notes had to be implemented.

Figure 46: Note Analyzer Post Conversion
After the implementation, the Note Analyzer shows a positive status.
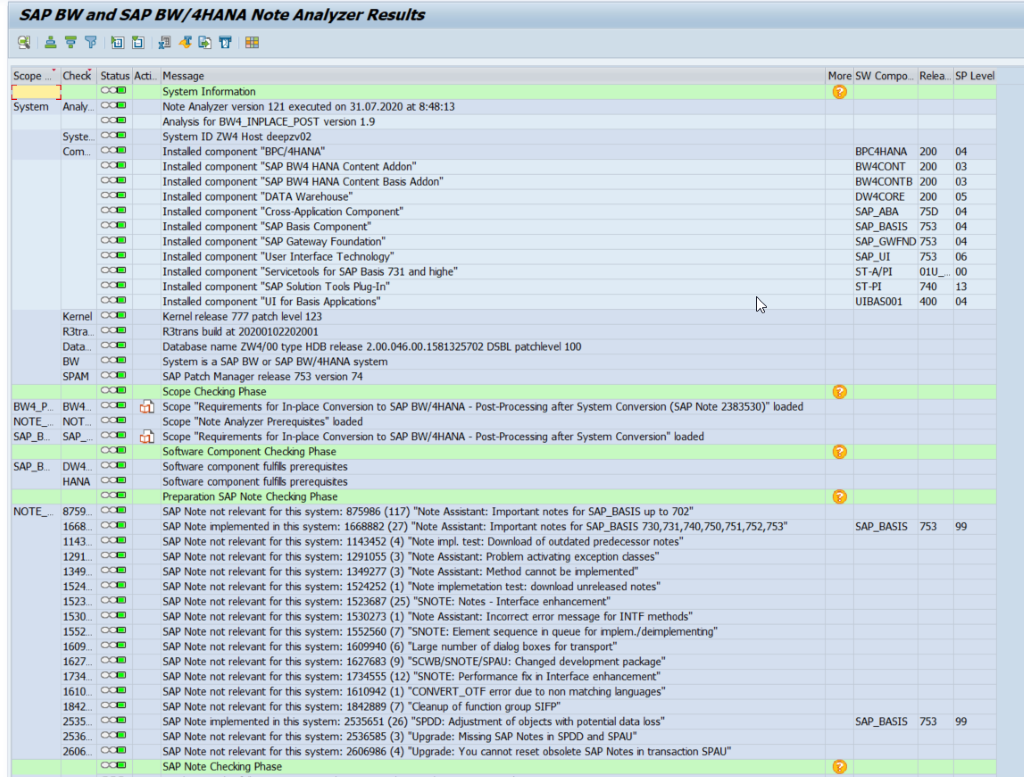
Figure 47: Note Analyzer finished
Another step mentioned in Figure 43 is to perform the Task List Run “SAP_BW4_AFTER_CONVERSION”. Start the transaction STC01 and select the Task List.
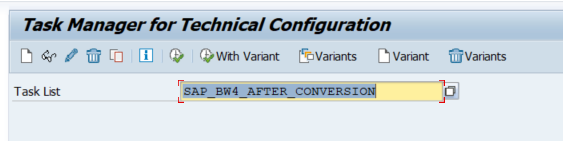
Figure 48: STC01 with Task List SAP_BW4_AFTER_CONVERSION
Check the last two phases to activate the Services for the BW Modelling Tools and SAP Analytics Cloud Integration.
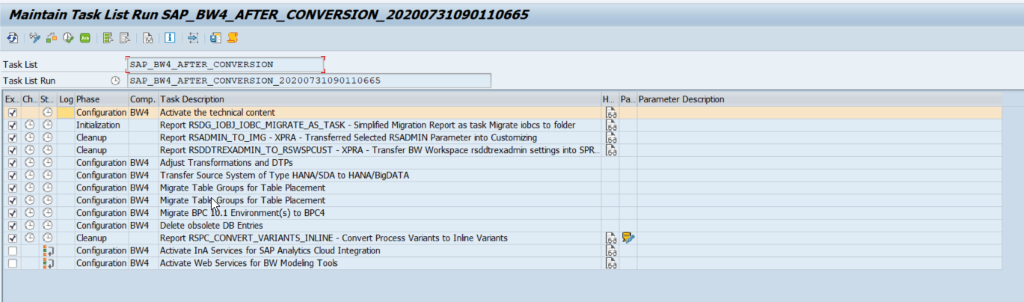
Figure 49: Task List Run SAP_BW4_AFTER_CONVERSION

Figure 50: Services for BW/4HANA
After the finalization of the Note Analyzer and the Task list run finish the SUM:
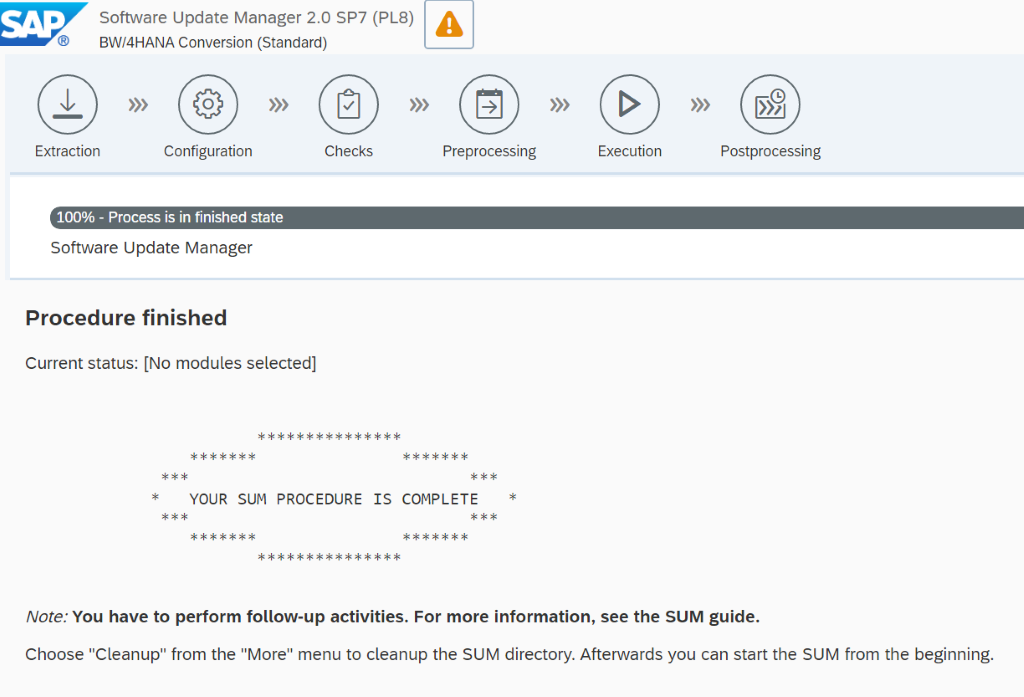
Figure 51: SUM Finish
Final Checks
BW/4HANA Cockpit
In our case the BW/4HANA Cockpit was not accessible at first. Therefore, we executed the transaction BW4CHECK, which shows you missing services which need to be activated.
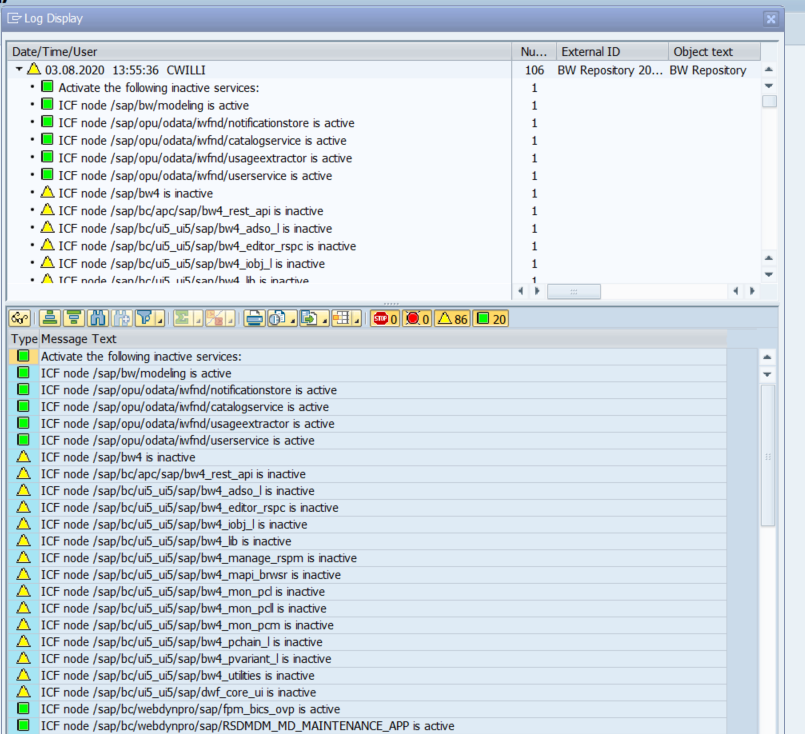
Figure 52: Transaction BW4CHECK
Then we activated the services in transaction SICF
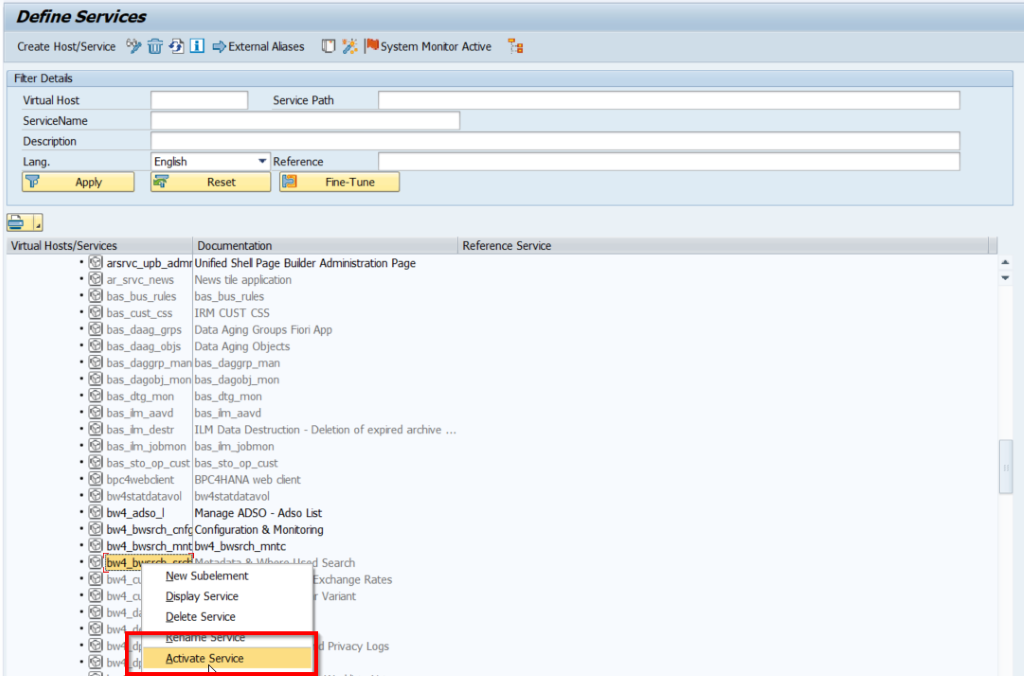
Figure 53: Activate missing services
Finally, the transaction BW4CHECK shows us that all services are running.
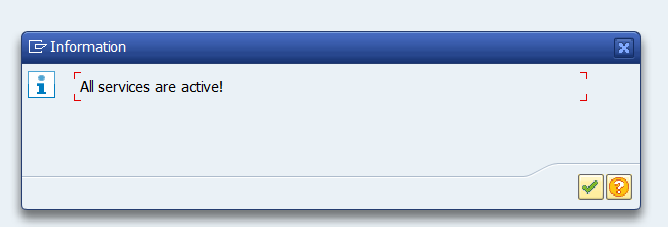
Figure 54: BW4CHEKC Services are active
The following link also gives an overview what needs to be done so that the BW4/HANA Cockpit is up and running
BW/4HANA
At the end, the BW4 Cockpit is up and running.
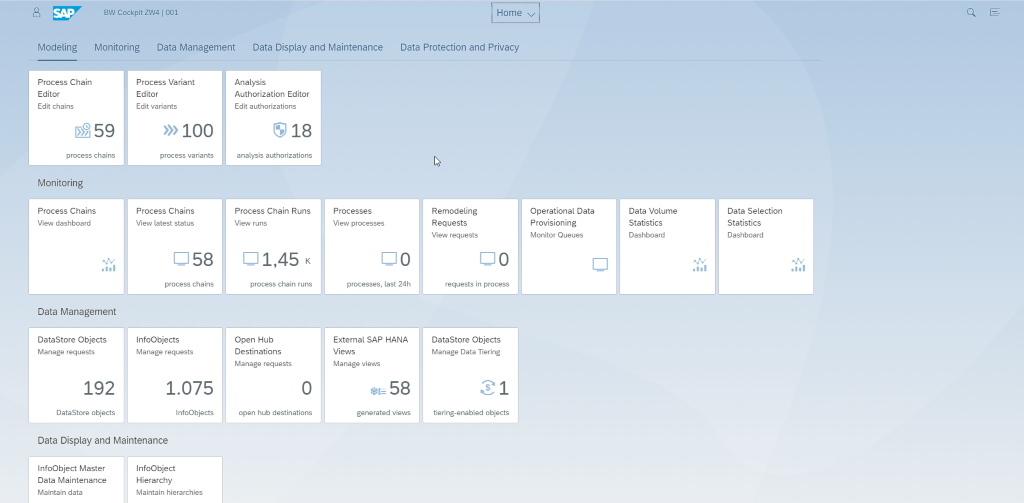
Figure 55: BW4 Cockpit
The Installed Software shows BW/4HANA
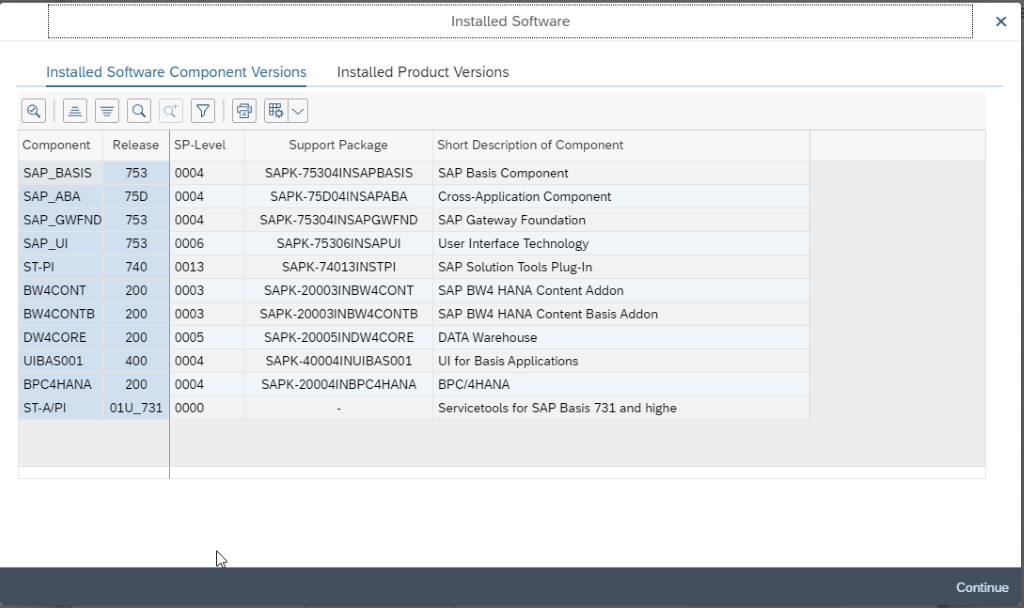
Figure 56: BW/4HANA Installed Software
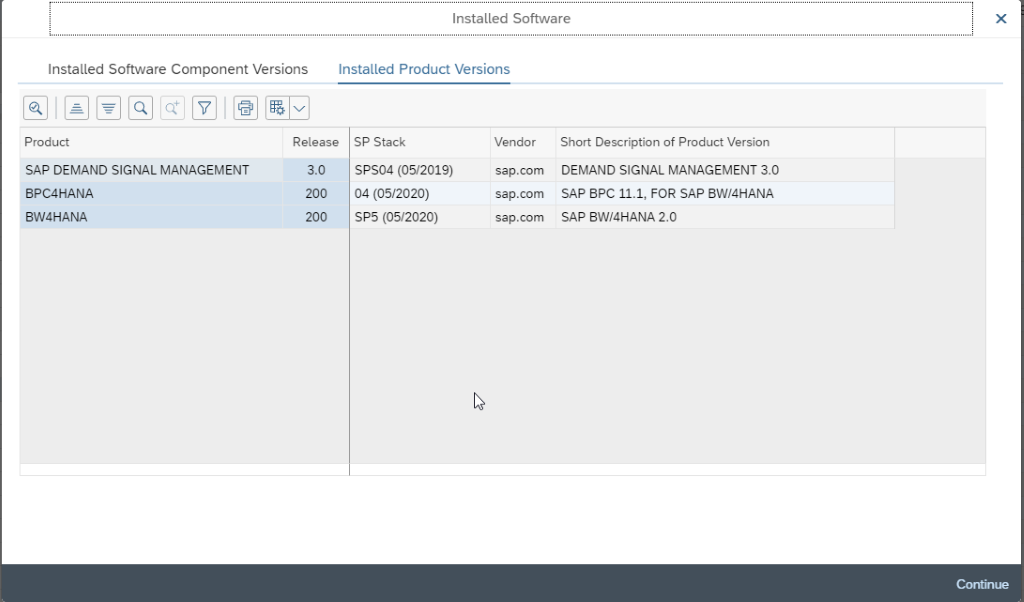
Figure 57: Installed Software BW/4HANA
Summary
In contrary to a normal BW upgrade known from the past, the InPlace Conversion is a completely different story. This document provides an overview of the different steps. If you need support, please feel free to contact ZPARTNER. We do have the experience in this area to get you from your existing BW System to BW/4HANA, regardless which approach you want to follow.