Introduction
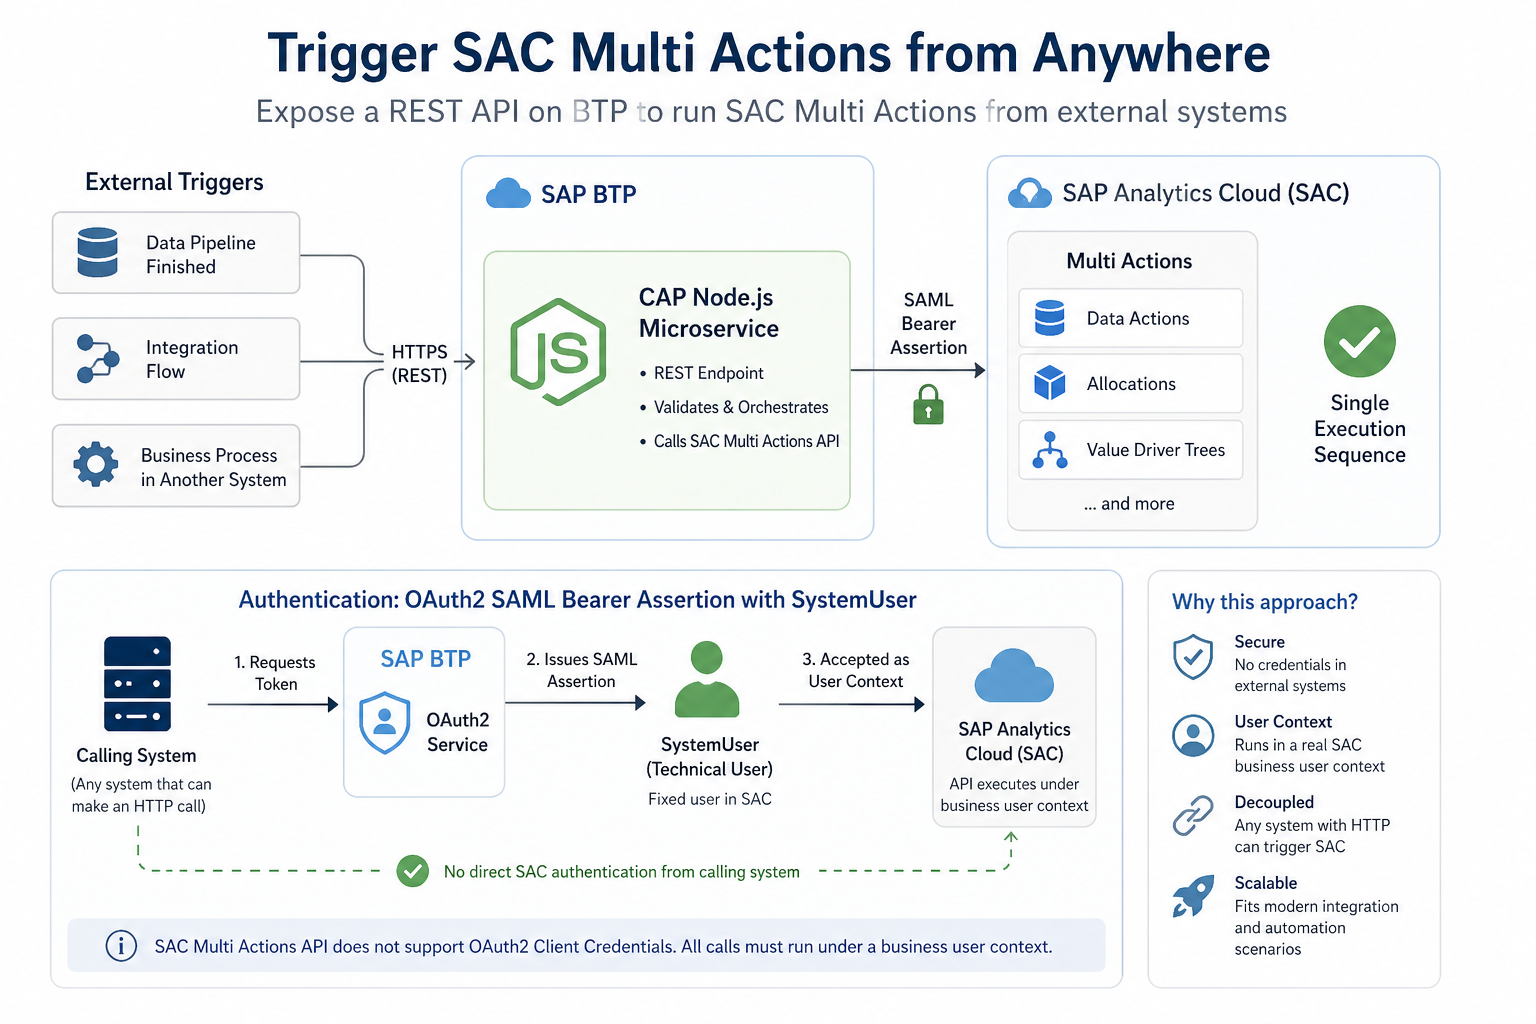
SAC Multi Actions let you chain planning operations (data actions, allocations, value driver trees) into a single execution sequence. Normally you trigger them from the SAC UI or SAC’s own scheduler.
But what if the trigger needs to come from outside SAC? A data pipeline that just finished loading, an integration flow, a business process in another system?
This post shows how to build a CAP Node.js microservice on BTP that exposes a REST endpoint for triggering SAC Multi Actions. Any authorized system that can make an HTTP call can use it.
Before you start, there is one constraint worth knowing: the SAC Multi Actions API does not support OAuth2 Client Credentials. All calls must run under a business user context.
The OAuth2SAMLBearerAssertion flow with a SystemUser is how you deal with this — BTP issues a SAML assertion for a fixed technical user, which SAC accepts as a valid user context. The calling system never has to touch SAC auth directly.
For a detailed introduction to the SAC Multi Actions Public API itself, refer to the official SAP blog post: Introduction of SAC Multi Actions Public API
────────────────────────────────────────────────────────────
Use cases
Trigger after external data loads
Many organizations feed data into SAC from ERP systems, data warehouses, or ETL pipelines. A planner typically has to manually kick off a Multi Action after the data arrives. With this proxy, the pipeline does it automatically as its last step.
SAP Integration Suite orchestration
If you use SAP Integration Suite, you can include a SAC Multi Action as a step in a larger integration flow: receive an ERP event, transform the data, load it into SAC, then immediately trigger a planning calculation.
Automated planning cycles
Finance and supply chain teams running fixed-schedule planning cycles can use any external scheduler to trigger Multi Actions over HTTP instead of relying on SAC’s internal scheduler alone.
RPA and Power Automate
Power Automate or UiPath workflows can trigger SAC planning steps without manual interaction. An approval flow, for example, could automatically kick off a Multi Action to recalculate affected planning figures.
Coming up: SAP Datasphere integration
A follow-up post will cover calling this proxy from SAP Datasphere, so a Datasphere data flow can trigger a SAC Multi Action on completion.
────────────────────────────────────────────────────────────
Concepts you need to know
SAP CAP (Cloud Application Programming Model)
CAP is SAP’s framework for building services on BTP. You define services declaratively in CDS, and CAP handles authentication, routing, and BTP service integration. Here it acts as the server that receives requests and forwards them to SAC.
XSUAA
XSUAA is BTP’s OAuth2 authorization server. It issues JWT tokens that authenticate service-to-service calls. The caller gets a JWT from XSUAA and includes it in every request to the proxy.
BTP Destination Service
The Destination Service is a centralized store for outbound connection configs. Instead of hardcoding URLs and credentials in the application, you define a destination in BTP Cockpit. The SAP Cloud SDK resolves it at runtime; the application code only references it by name.
OAuth2SAMLBearerAssertion
This is the auth flow for calling the SAC API. BTP creates a signed SAML assertion and exchanges it for a SAC OAuth token. With a SystemUser set in the destination, the token always issues for a fixed technical user, which is what you want for automated, non-interactive scenarios.
────────────────────────────────────────────────────────────
Architecture
Here is the full flow end-to-end:
Caller (external app, scheduler, integration flow)
│
│ POST /rest/sac/execute_multiaction
│ Authorization: Bearer <XSUAA JWT>
▼
┌────────────────────────────────────────────┐
│ cap-sac-proxy │
│ (CAP on Cloud Foundry) │
│ │
│ 1. Validate JWT (XSUAA middleware) │
│ 2. Resolve destination (Cloud SDK) │
│ 3. Fetch CSRF token from SAC │
│ 4. POST to SAC Multi Actions API │
└───────────────────┬────────────────────────┘
│
│ OAuth2SAMLBearerAssertion
▼
BTP Destination Service
│
▼
SAP Analytics Cloud API
POST /api/v1/multiActions/{id}/executions
A few things to note about this design:
- The caller only needs a BTP JWT. No knowledge of SAC auth required.
- SAC credentials stay in the Destination Service, not in application code.
- CSRF handling is internal. SAC requires a token for all writes, and the proxy fetches one before every call.
────────────────────────────────────────────────────────────
Prerequisites
All three steps below are also covered in detail — including screenshots and field-level guidance — in the official SAP blog post Introduction of SAC Multi Actions Public API. The summaries here reflect the configuration used in this project.
1. Set up the SAC OAuth client
In SAC, navigate to System → Administration → App Integration → OAuth Clients and create a new client:
| Field | Value |
| Purpose | API Access |
| Authorization Grant | SAML 2.0 Bearer |
Note: The OAuth client configuration has changed over time. As of 2025, use Purpose: API Access and Authorization Grant: SAML 2.0 Bearer. Earlier releases used “Interactive Usage”; refer to the SAC Multi Actions Public API blog post for version-specific details.
Note the Client ID and Client Secret. You will need both in the next step.
2. Configure the BTP destination
In BTP Cockpit, navigate to your BTP Subaccount → Connectivity → Destinations → New Destination and configure it as follows:
| Field | Value |
| Name | <your-destination-name> |
| Type | HTTP |
| URL | https://<your-sac-tenant>.hanacloudservices.cloud.sap |
| Proxy Type | Internet |
| Authentication | OAuth2SAMLBearerAssertion |
| Audience | https://<your-sac-tenant>.hanacloudservices.cloud.sap |
| Client Key | *(OAuth Client ID from SAC)* |
| Token Service URL | https://<your-sac-tenant>.hanacloudservices.cloud.sap/oauth/token |
| Token Service User | *(OAuth Client ID from SAC)* |
| Token Service Password | *(OAuth Client Secret from SAC)* |
| System User | <sac-technical-user-email> |
The System User field is what makes this work for automated scenarios. It pins the SAML assertion to a specific technical user, so the integration never requires interactive login.
After saving, click Check Connection to verify BTP can reach SAC successfully.
Important: This destination must be created in the same BTP subaccount where you will deploy the CAP proxy. The SAP Cloud SDK only searches for destinations within the subaccount it is running in.
Note on SystemUser: The SystemUser additional property in BTP destinations is deprecated but can still be added manually as a custom additional property (Name: SystemUser, Value: <sac-user-email>). As an alternative, user propagation via JWT token is the recommended long-term approach. See the SAP Help Portal for details.
3. Configure trust between BTP and SAC
The OAuth2SAMLBearerAssertion flow works by having BTP sign a SAML assertion with its own X.509 certificate and send it to SAC in exchange for an OAuth token. For SAC to accept this, it must first trust the BTP subaccount as an identity provider.
You only do this once, but it must be done before the destination connection check will pass.
Download the IDP metadata and trust certificate from BTP
In BTP Cockpit, navigate to your subaccount → Connectivity → Destinations. At the top of the destinations list, click Download IDP Metadata. Open the downloaded XML file and note the entityID value from the <ns3:EntityDescriptor> element — you will need this as the Provider Name in SAC.
Next, click Download Trust. This downloads the public X.509 certificate that BTP uses to sign SAML assertions. Copy the certificate content — you will paste it into SAC in the next step.
Register BTP as a trusted identity provider in SAC
In your SAC tenant, navigate to System → Administration → App Integration. Scroll to the Trusted Identity Providers section and click Add a Trusted Identity Provider.
| Field | Value |
| Name | A descriptive name (e.g. BTP-<subaccount-name>) |
| Provider Name | The entityID from the IDP metadata XML |
| Signing Certificate | The certificate content from Download Trust |
Save the configuration, then return to BTP Cockpit → Connectivity → Destinations → open your SAC destination → click Check Connection to verify. A Missing key pair for subaccount error usually means the certificate is not registered in SAC yet, or the Provider Name does not match the entityID from the IDP metadata.
────────────────────────────────────────────────────────────
Building the CAP proxy service
Project structure
The service is intentionally minimal:
cap-sac-proxy/
├── srv/
│ ├── sac-service.cds # Service definition
│ ├── sac-service.js # Request handler
│ └── lib/
│ └── sac-client.js # SAC API logic
├── xs-security.json # XSUAA configuration
└── mta.yaml # BTP deployment descriptor
Service definition
CAP uses a declarative language called CDS to define services:
@protocol: ‚rest‘
@requires: ‚authenticated-user‘
service SACService {
action execute_multiaction(multiaction_id: String) returns {};
action create_publication(action: String, @open data: {}) returns {};
}
@protocol: ‚rest‘ exposes this as a plain REST API rather than OData. @requires: ‚authenticated-user‘ tells CAP to validate the incoming XSUAA JWT and reject unauthenticated requests with a 401.
The CSRF token flow
SAC protects write operations with CSRF tokens. Before any POST, you need a valid token from SAC to include in the request.
The proxy handles this automatically:
async function getCsrfToken() {
const destination = await resolveDestination();
const response = await executeHttpRequest(destination, {
method: ‚GET‘,
url: ‚/api/v1/csrf‘,
headers: { ‚x-csrf-token‘: ‚fetch‘ }
});
return {
csrfToken: response.headers[‚x-csrf-token‘],
cookies: response.headers[’set-cookie‘]
};
}
The caller never touches CSRF tokens. Every execute_multiaction call fetches a fresh one first.
Triggering a Multi Action
async function triggerMultiAction(multiactionId) {
const { csrfToken, cookies } = await getCsrfToken();
const response = await executeHttpRequest(
{ destinationName: DESTINATION },
{
method: ‚POST‘,
url: `/api/v1/multiActions/${multiactionId}/executions`,
headers: {
‚x-csrf-token‘: csrfToken,
‚Cookie‘: [].concat(cookies).join(‚; ‚),
‚Content-Type‘: ‚application/json‘
},
data: { parameterValues: [] }
}
);
return response.data;
}
The SAP Cloud SDK’s executeHttpRequest handles the OAuth2 token exchange automatically. It reads the destination, runs the SAML Bearer Assertion flow, and attaches the correct Authorization header to the outgoing SAC request.
────────────────────────────────────────────────────────────
Deploying to BTP Cloud Foundry
What gets deployed
The mta.yaml file describes the full deployment. The MTA deployer creates everything automatically:
- The CAP application itself on Cloud Foundry
- An XSUAA service instance for validating incoming JWT tokens
- A Destination service instance for resolving the SAC destination at runtime
Before you build
Open srv/lib/sac-client.js and update the destination name to match what you configured in BTP Cockpit:
const DESTINATION = ‚<your-destination-name>‘;
Build and deploy
# Install build tool (once)
npm install -g mbt
# Log in to Cloud Foundry
cf login –sso -a https://api.cf.<region>.hana.ondemand.com
cf target -o „<your-org>“ -s „<your-space>“
# Build
mbt build
# Deploy
cf deploy mta_archives/cap-sac-proxy_1.0.0.mtar
The deploy output will show your application URL:
Verify the deployment
cf apps # check app is running
cf logs cap-sac-proxy-srv –recent # check startup logs
────────────────────────────────────────────────────────────
Calling the API
The repository includes a ready-to-use Postman collection at cap-sac-proxy.postman_collection.json. Import it into Postman and fill in the collection variables before running any request.
Collection variables
| Variable | Where to get it |
| baseUrl | Your deployed app URL + /rest/sac (from cf apps) |
| xsuaaUrl | The url field from the XSUAA service key |
| clientId | The clientid field from the XSUAA service key |
| clientSecret | The clientsecret field from the XSUAA service key |
| multiactionId | Your Multi Action ID from SAC (see below) |
To get the XSUAA service key values:
cf create-service-key xsuaa-cap-sac-proxy my-key
cf service-key xsuaa-cap-sac-proxy my-key
The accessToken variable is filled in automatically after running the Auth request.
Auth — Get Token
Sends a client credentials request to XSUAA:
POST {{xsuaaUrl}}/oauth/token
Content-Type: application/x-www-form-urlencoded
grant_type=client_credentials
&client_id={{clientId}}
&client_secret={{clientSecret}}
The test script in the request automatically writes the returned access_token into the accessToken collection variable, so subsequent requests pick it up without any manual copy-paste.
Execute Multiaction
Triggers a SAC Multi Action by ID:
POST {{baseUrl}}/execute_multiaction
Authorization: Bearer {{accessToken}}
Content-Type: application/json
{
„multiaction_id“: „{{multiactionId}}“
}
The Multi Action ID can be found in SAC under Multi Actions → [your action] → URL or API details.
A successful response looks like:
{
„status“: „RUNNING“,
„executionId“: „…“
}
────────────────────────────────────────────────────────────
Conclusion
That is it. An external system makes one HTTP call with a BTP JWT, and SAC runs the Multi Action. The proxy handles CSRF tokens, SAML assertions, and OAuth exchanges without exposing any of it to the caller.
If you are setting this up for the first time, the trust configuration between BTP and SAC is where things tend to go wrong. It can fail silently, and the error messages are not always helpful. Get that working first and the rest is straightforward.
What’s next
The next post covers calling this proxy from SAP Datasphere to close the loop between data integration and planning.
Full source: cap-sac-proxy